Okay, guys, I finally got my shipment of gears in the mail. Just so you know these gears are not direct OEM replacements. The gears I have are to change the gear setup slightly to make it a 2 gear solution instead of 3 gears. So there is more work to be done besides just replacing one gear. The downfall of the two gear solution is that the drive is a bit noisier. However, on the plus side the load times for games are cut almost in half

I am charging $12 for these gears since I have to drill out the holes on them to the correct size which requires some patience. If you go too fast the hole gets crooked rendering the gear useless. I test out every gear to make sure it is nice and straight before shipping.
Pics of another thread on here will be used to explain some of this since I don't currently have a drive apart that I can take pictures of. I will update with current pics of everything once I perform this repair myself again in the future.
I am going to start my write up on this as if everyone here already knows how to take their drive apart and disconnect the ribbon cables for the CD lens. That part is found in this write up
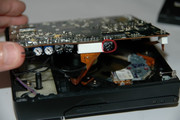
https://www.pcenginefx.com/forums/index.php?topic=7193.01. First you have to get the motherboard moved out of the way so you can see the lens drive assembly. Once at that point you will want to unscrew the 3 screws(circled in red) holding down the lens assembly and very carefully lift the assembly up. Do not lift too far cause there will still be wires attached to it.

2. Now that you have the lens assembly up in the air you are going to have to remove the middle Metal shaft for the old broken middle gear(cirlced in red). You do this by using a pair of small pliers and pull out while twisting it back and forth. The metal shaft I speak of is the one that is stationary and doesn't spin.

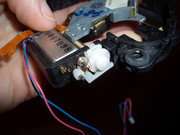
3. Remove the small metal part below the lens motor(circled in red). This is to make enough room for our new gear to fit. You do this by removing the one Phillips screw that is holding it on. After that part is off put the screw back in so your lens motor is still held on well.

4. Remove the old gear from the lens motor by just pulling it off. It may be on there pretty good so use a small flat head screw driver to push it off if you have to. Now push on the new gear until the teeth line up nicely. The new gear will take a bit of force to push it on. If you push it on too far use a flat head screw driver to pry it back off again.

5.(optional and usually not needed)If the gear seems like it is too far away from the main spindle you might have to flip over the lens motor. Not sure why if it's due to the mounting or if the center spindle on the motor isn't perfectly straight but I'd say about %10 of CD drives have to have the lens motor flipped over for the gear to line up correctly.
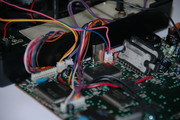
6. You must change the polarity on the lens motor itself. To do this you start by pulling the white connector end for it off of the motherboard(circled in red). It is the cable with a blue and pink wire. Once you have the cable disconnected from the board you use a very small flat head to hold the plastic clips away on the white connector end. With the plastic clips held out you can pull out the two wires. Now that the wires are removed just put them back in the opposite direction. The wires should clip back in. Alternatively you could de-solder and then re-solder the wires in reverse on the motor itself. When you have it correct the wires will be opposite of the wires in the picture here. So blue on the right and pink on the left instead.

7. re-assemble your drive by putting the lens assembly back and re-attaching your lens ribbon cables. Put the bottom cover back on your drive but do not screw the bottom panel back on yet as you might need to remove it to do some adjustments.
8. Your drive should now be usable but there may be some fine tuning to be done. Most likely you won't have to do this next step but 10% of the time the drive will need the spindle speed potentiometer adjusted a little to make up for the slightly different gear size(circled in red). The best way to test this is to use an audio CD with lots of tracks on it. Hit the play button on your CD drive and listen to the first couple tracks and see if they work fine. Then try playing the very last tracks on the CD and see if they also work fine. If not then you will have to adjust the speed slightly one way or the other. The last tracks on a CD might skip a little until you get it right. I use YS 1&2 to test this out since it has the most audio tracks of any game I can think of. This part is what can take a quite a bit of time to get it just right.
